

We've all been there. You lift your phone, it glances at you, and click—it unlocks. You upload a group selfie to social media, and before you can type a name, a little box appears around your friend Sarah's face suggesting a tag.
It feels like magic, but under the hood, it's a rigorous three-step dance of mathematics and probability.
In the AI world, we often hear the blanket term "Facial Recognition," but that's actually just one part of the story. To build these systems (or just understand them), you need to distinguish between three distinct concepts: Detection, Verification, and Recognition.
Let's break them down using plain English and some analogies.
1. Face Detection: "The Head Count"
Before a computer can tell who you are, it has to figure out if you are even there.
Face Detection is the act of finding a face in an image. It doesn't care if the face belongs to the Pope or your neighbor; it just wants to know: "Is there a human face in this picture, and where is it?"
The Analogy
Imagine a teacher counting heads on a school bus. They aren't checking the roster to see if Johnny is on the bus yet; they are just scanning to make sure they see 30 human-shaped heads. That is detection.
Under the Hood
Old School: Algorithms like Viola-Jones used "Haar Cascades" to look for simple patterns, like the bridge of the nose being lighter than the eye sockets.
New School: Modern Deep Learning (CNNs) looks for complex features and can find faces even when they are turned sideways, partially covered by a mask, or in poor lighting.
The Output: A set of coordinates (X, Y, Width, Height) that draws a "Bounding Box" around the face.
Visual Example: Detection in Action
Original Image → Detection Model → Bounding Boxes
[Group photo]  →  [MTCNN/YOLO]  → 🟦🟦🟦 (3 faces found)
Real-world scenario: Security cameras at airports scanning crowds. They need to detect every face before they can verify anyone's identity.
Popular Detection Models (2024-2025)
| Model | Speed | Accuracy | Best Use Case |
|---|---|---|---|
| MTCNN | Medium | High | Angled faces, robust detection |
| RetinaFace | Fast | Very High | Production systems, real-time |
| YOLO-Face | Very Fast | High | Video streams, edge devices |
| MediaPipe Face Detection | Ultra Fast | Medium-High | Mobile apps, web browsers |
| Haar Cascades | Fast | Low | Legacy systems, simple tasks |
Pro Tip: For most modern applications, RetinaFace is the sweet spot between accuracy and speed.
2. Face Verification: "The ID Check" (1:1)
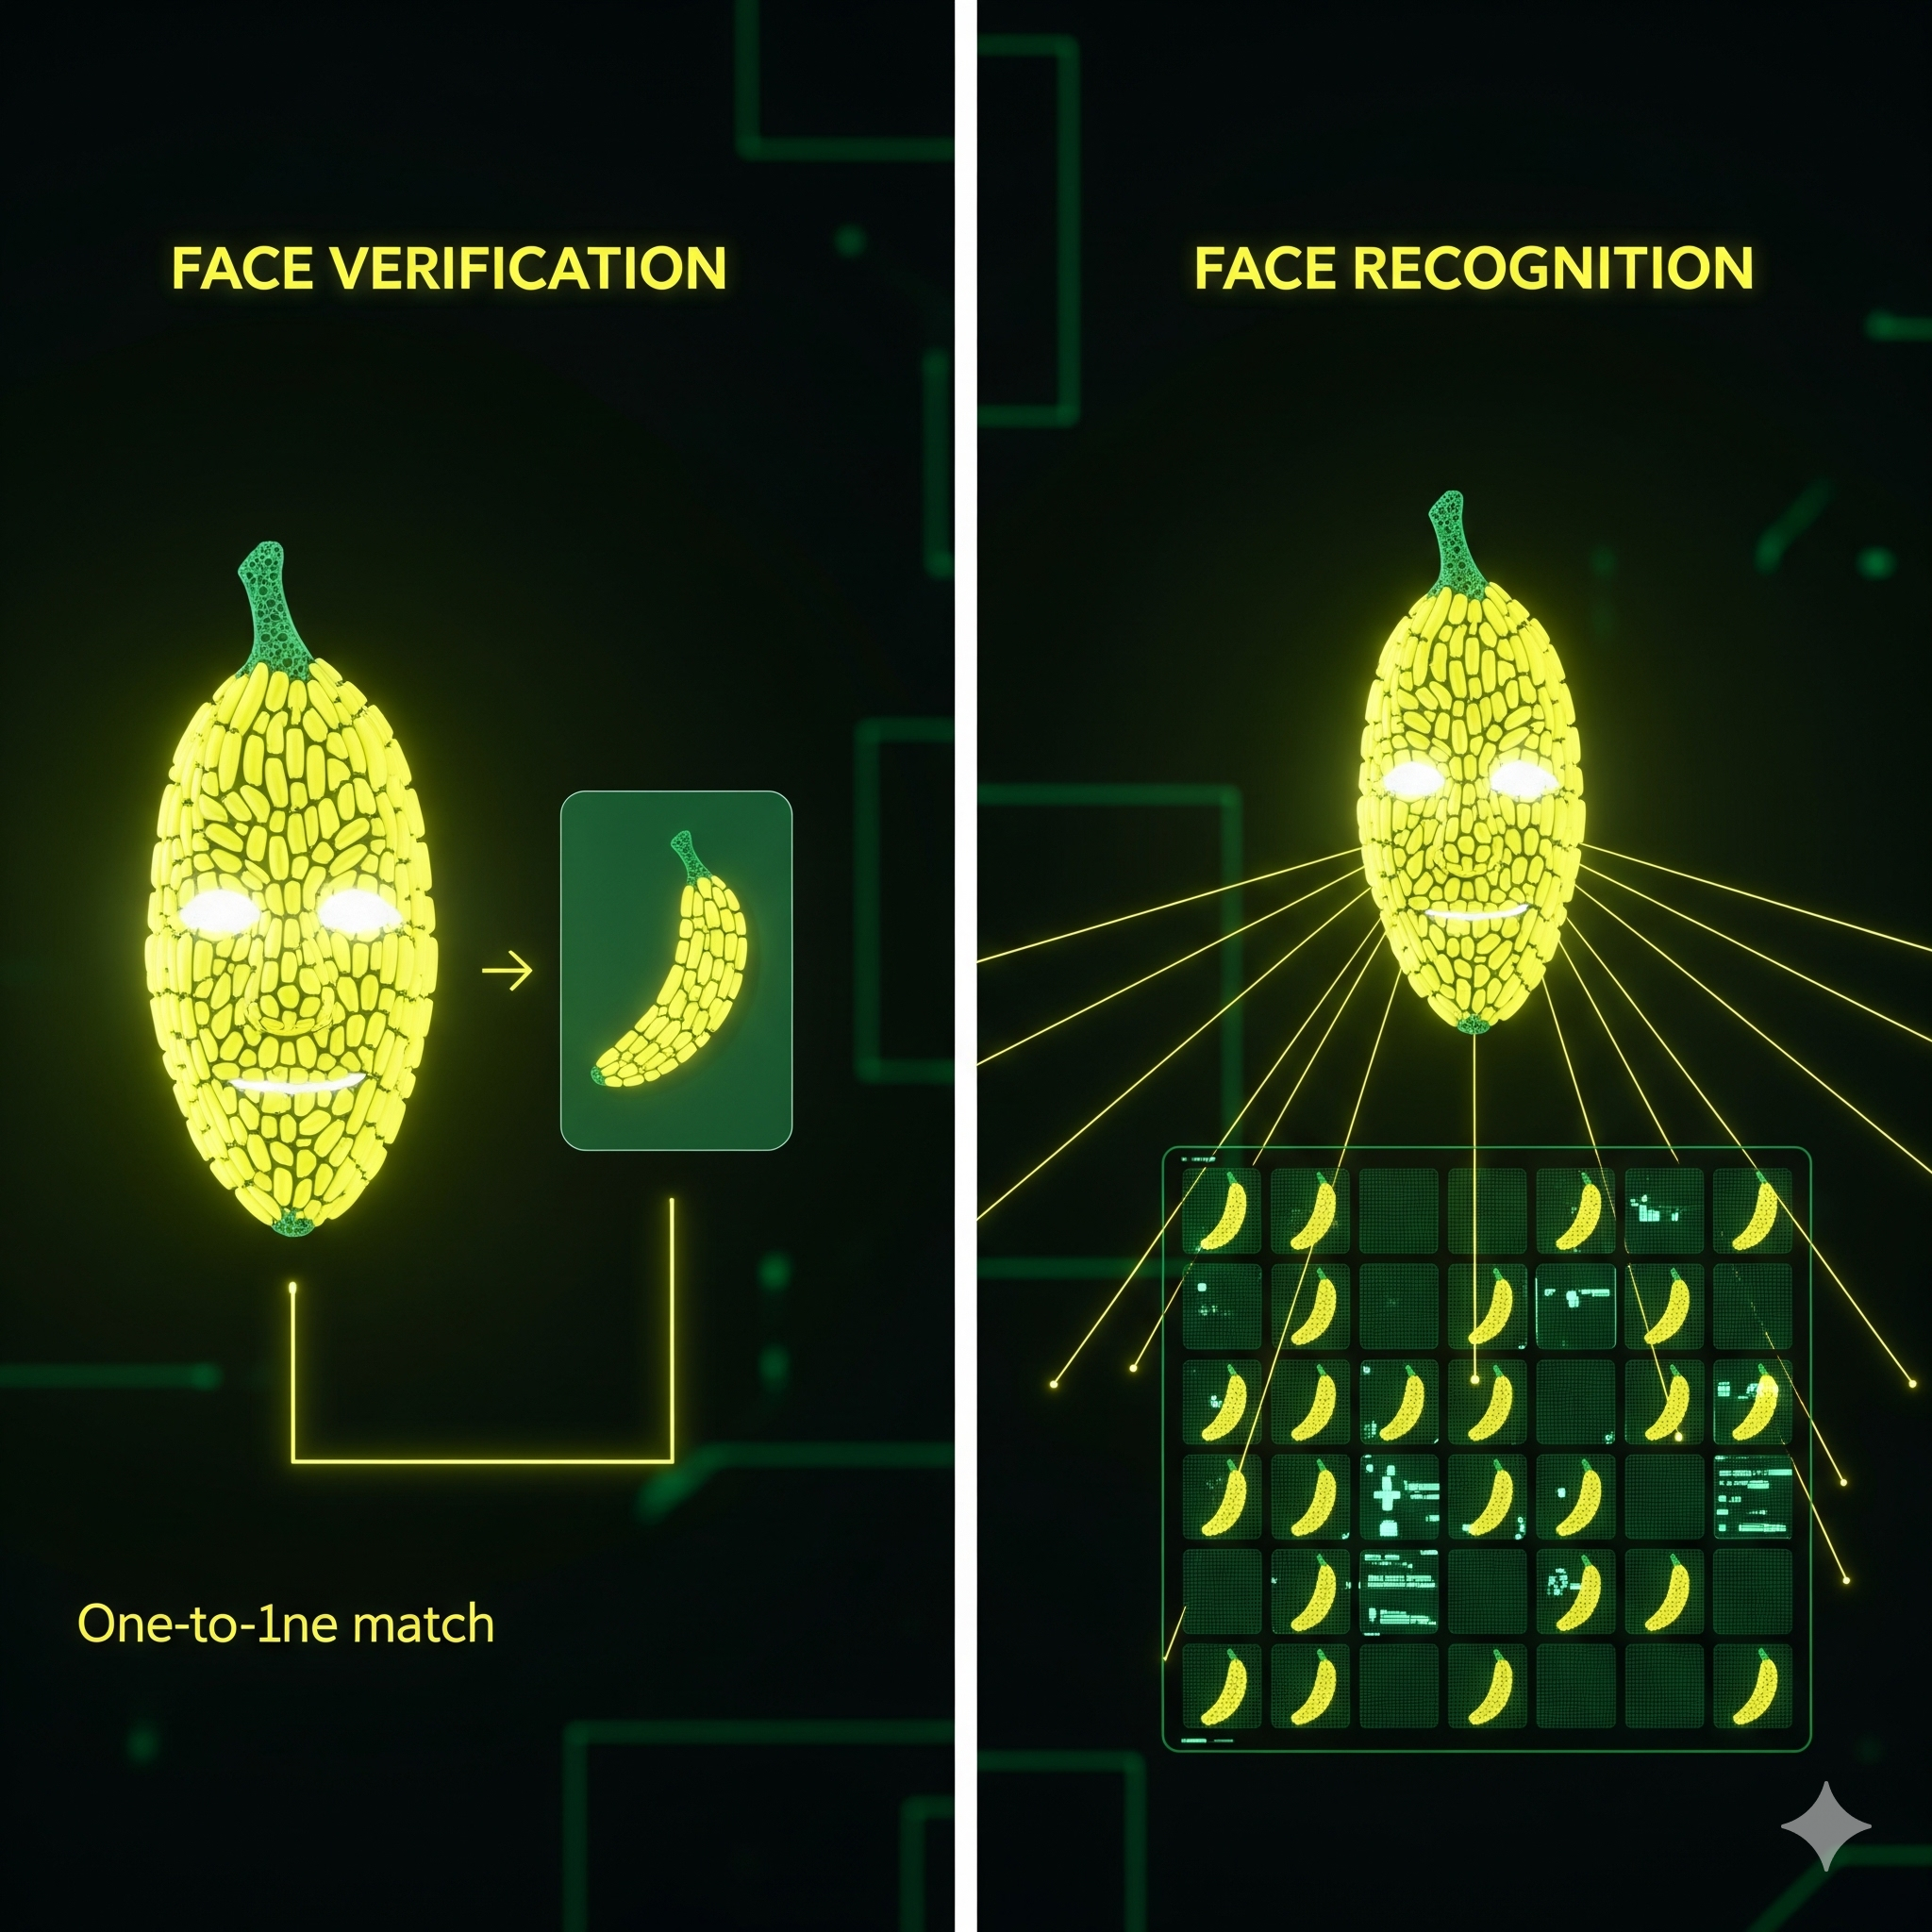
Once the face is detected, we move to Verification. This is a one-to-one (1:1) comparison.
The system is asking a specific question: "Is this person who they claim to be?"
The Analogy
Think of a Border Control officer at the airport. You hand them your passport (the "claimed identity"). They look at the photo in the passport, then they look at your face. They are comparing Image A (you right now) against Image B (the file on record). They aren't looking through a book of every criminal in the world; they are just checking if A == B.
Real-World Use Cases
- Unlocking your iPhone (FaceID): The phone compares your face now to the mathematical model of your face stored on the chip.
- e-Gates at airports: Matching your live face to the biometric data in your passport chip.
- Banking apps: Verifying you are the account holder before approving a transaction.
- Building access control: Matching your face to your employee record before letting you in.
The Math Behind Verification
When you verify a face, the system:
- Extracts embeddings from both images (the 512-dimensional vectors we'll talk about later)
- Calculates the distance between these vectors (usually Euclidean or Cosine distance)
- Compares to a threshold:
- Distance < 0.6 → ✅ Same person
- Distance > 0.6 → ❌ Different person
# Simple verification example
import face_recognition

# Load the two images
known_image = face_recognition.load_image_file("john_passport.jpg")
unknown_image = face_recognition.load_image_file("john_live.jpg")

# Get encodings
known_encoding = face_recognition.face_encodings(known_image)[0]
unknown_encoding = face_recognition.face_encodings(unknown_image)[0]

# Compare faces
results = face_recognition.compare_faces([known_encoding], unknown_encoding)

if results[0]:
    print("✅ It's the same person!")
else:
    print("❌ Not a match")
The Challenge: False Acceptance vs. False Rejection
Every verification system walks a tightrope:
- False Acceptance Rate (FAR): Letting the wrong person in (security risk)
- False Rejection Rate (FRR): Rejecting the right person (user frustration)
High-security systems (border control) set the bar high → More false rejections, but safer.
User-friendly systems (phone unlock) are more lenient → Faster but slightly less secure.
3. Face Recognition: "The Wanted Poster" (1:N)
This is the heavy lifter. Face Recognition (or Identification) is a one-to-many (1:N) search.
The system captures a face and compares it against a massive database of known faces to find a match. It doesn't ask "Is this John?"; it asks "Who is this?"
The Analogy
Imagine a detective walking into a bar with a "Wanted" poster. They look at a patron's face, then mentally scan through their memory of hundreds of suspects to see if there is a match.
Real-World Use Cases
- Facebook photo tagging: "Is this Sarah, Mike, or Tom?"
- Police surveillance: Matching a suspect caught on CCTV against a database of known criminals
- Employee attendance systems: Automatic check-in when you walk through the door
- Lost children identification: Matching a found child against a database of missing persons
The Challenge
This is computationally expensive and harder to get right. As your database grows (N gets bigger), the chance of a "False Positive" (confusing two lookalikes) increases.
The math: If you have 1 million faces in your database, the system needs to:
- Detect the unknown face
- Generate its embedding (512 numbers)
- Compare those 512 numbers against 1 million other sets of 512 numbers
- Find the closest match(es)
- Return results above a confidence threshold
Speed Optimization: The Secret Weapons
1. Vector Databases
Instead of comparing face-by-face, modern systems use specialized databases:
- FAISS (Facebook AI Similarity Search): GPU-accelerated, handles billions of vectors
- Milvus: Open-source vector database with amazing scalability
- Pinecone: Managed service, plug-and-play
- Qdrant: Fast and efficient, great for production
These databases use clever indexing (like "Approximate Nearest Neighbor" search) to find matches in milliseconds instead of hours.
2. Clustering & Pre-filtering
Smart systems don't search the entire database:
- Age grouping: Only search faces within ±10 years
- Gender filtering: Male faces → male database
- Ethnicity estimation: Narrow down the search space
- Time-based filtering: Only search people who were in the building today
How It Works: The Magic of Embeddings
Computers don't see noses and eyebrows; they see numbers.
When a face is processed, the AI converts it into a Vector or Embedding. This is a list of numbers (often 128, 512, or more) that represents the unique geometry of the face.
The Process
Step 1: The face is aligned (eyes leveled).
Step 2: The model maps facial landmarks (corners of eyes, tip of nose).
Step 3: These landmarks are converted into the vector.
Visualizing Embeddings
Think of it like this:
Your Face → Neural Network → [0.23, -0.71, 0.45, 0.82, ...]
                               └─────── 512 numbers ──────┘
Each number captures something subtle about your face:
- Number 47 might encode your jaw width
- Number 203 might capture the distance between your eyes
- Number 389 might represent your nose shape
Distance Calculation
To "match" two faces, the computer simply calculates the distance between the two lists of numbers.
- Short Distance: Same person (or very close lookalike)
- Long Distance: Different people
Common distance metrics:
- Euclidean Distance: Straight-line distance in 512-dimensional space
- Cosine Similarity: Measures the angle between vectors (often better for faces)
# Calculating distance manually
import numpy as np

embedding1 = np.array([0.23, -0.71, 0.45, ...])  # 512 numbers
embedding2 = np.array([0.24, -0.69, 0.44, ...])  # 512 numbers

# Euclidean distance
distance = np.linalg.norm(embedding1 - embedding2)

# Cosine similarity
cosine_sim = np.dot(embedding1, embedding2) / (np.linalg.norm(embedding1) * np.linalg.norm(embedding2))

if distance < 0.6:  # Threshold depends on the model
    print("Same person!")
The Toolbox: Models & Repos You Should Know
If you want to build this yourself, don't start from scratch. Here are the industry-standard open-source libraries and models used in 2024-2025.
For Beginners (Python)
1. face_recognition
The "Hello World" of face tech. Built on top of dlib. It is incredibly easy to use.
import face_recognition

unknown_image = face_recognition.load_image_file("me.jpg")
face_locations = face_recognition.face_locations(unknown_image)

print(f"Found {len(face_locations)} face(s)")
GitHub: https://github.com/ageitgey/face_recognition
⭐ Stars: 52k+
Pros: Simplest API, great documentation, works out of the box
Cons: Not the fastest, harder to deploy at scale
2. DeepFace
A lightweight wrapper for Python that supports multiple backends (VGG-Face, Google FaceNet, OpenFace, Facebook DeepFace). Great for testing different models with one line of code.
from deepface import DeepFace

result = DeepFace.verify(img1_path = "img1.jpg", img2_path = "img2.jpg")
print(result["verified"])  # True or False

# Or use it for recognition
df = DeepFace.find(img_path = "img.jpg", db_path = "my_database")
GitHub: https://github.com/serengil/deepface
⭐ Stars: 13k+
Pros: Multiple models, facial attribute analysis (age, gender, emotion), simple API
Cons: Slower than production-grade solutions
Supported models:
- VGG-Face
- FaceNet (Google)
- OpenFace
- DeepFace (Facebook)
- DeepID
- ArcFace
- Dlib
- SFace
For Production & Mobile
3. MediaPipe Face Mesh
Built by Google. Extremely fast and lightweight. Runs smoothly on mobile devices and even in JavaScript (web browsers). Perfect for real-time applications (like Snapchat filters or basic detection).
import mediapipe as mp
import cv2

mp_face_mesh = mp.solutions.face_mesh
face_mesh = mp_face_mesh.FaceMesh()

image = cv2.imread("face.jpg")
results = face_mesh.process(cv2.cvtColor(image, cv2.COLOR_BGR2RGB))

if results.multi_face_landmarks:
    print(f"Detected {len(results.multi_face_landmarks)} face(s)")
GitHub: https://github.com/google/mediapipe
⭐ Stars: 27k+
Pros: Real-time performance, mobile-friendly, 468 facial landmarks
Cons: Not designed for recognition, mainly for detection and mesh generation
Use cases:
- AR filters (Snapchat, Instagram)
- Face tracking for animation
- Gaze detection
- Facial expression analysis
For State-of-the-Art Accuracy
4. InsightFace
Currently considered one of the best open-source libraries for 2D and 3D face analysis. Uses ArcFace and RetinaFace models. Highly accurate but requires a bit more setup than the beginner libraries.
import insightface
from insightface.app import FaceAnalysis

app = FaceAnalysis()
app.prepare(ctx_id=0, det_size=(640, 640))

img = cv2.imread("test.jpg")
faces = app.get(img)

for face in faces:
    print(f"Age: {face.age}, Gender: {face.gender}")
    embedding = face.embedding  # 512-dimensional vector
GitHub: https://github.com/deepinsight/insightface
⭐ Stars: 23k+
Pros: State-of-the-art accuracy, 3D face reconstruction, age/gender/emotion analysis
Cons: Steeper learning curve, requires more computing power
Key models:
- ArcFace: Industry-leading face recognition
- RetinaFace: Robust face detection
- SCRFD: Ultra-fast detection for edge devices
The Heavyweights (Frameworks)
5. OpenCV
The grandfather of computer vision. Great for the "Detection" phase, but for "Recognition," you usually pair it with one of the deep learning models above.
import cv2

# Load the pre-trained Haar Cascade
face_cascade = cv2.CascadeClassifier(cv2.data.haarcascades + 'haarcascade_frontalface_default.xml')

img = cv2.imread('group_photo.jpg')
gray = cv2.cvtColor(img, cv2.COLOR_BGR2GRAY)

faces = face_cascade.detectMultiScale(gray, 1.1, 4)

for (x, y, w, h) in faces:
    cv2.rectangle(img, (x, y), (x+w, y+h), (255, 0, 0), 2)

cv2.imshow('Faces', img)
cv2.waitKey(0)
Website: https://opencv.org/
GitHub: https://github.com/opencv/opencv
⭐ Stars: 78k+
6. TensorFlow / PyTorch
The underlying engines that run the deep learning models. If you want to train your own face recognition model from scratch, you'll use one of these.
TensorFlow: https://www.tensorflow.org/
PyTorch: https://pytorch.org/
Comparison Table: Which Library Should You Use?
| Library | Ease of Use | Speed | Accuracy | Production Ready | Mobile Support |
|---|---|---|---|---|---|
| face_recognition | ⭐⭐⭐⭐⭐ | ⭐⭐⭐ | ⭐⭐⭐⭐ | ⭐⭐⭐ | ⭐⭐ |
| DeepFace | ⭐⭐⭐⭐⭐ | ⭐⭐⭐ | ⭐⭐⭐⭐ | ⭐⭐⭐ | ⭐⭐ |
| MediaPipe | ⭐⭐⭐⭐ | ⭐⭐⭐⭐⭐ | ⭐⭐⭐ | ⭐⭐⭐⭐⭐ | ⭐⭐⭐⭐⭐ |
| InsightFace | ⭐⭐⭐ | ⭐⭐⭐⭐ | ⭐⭐⭐⭐⭐ | ⭐⭐⭐⭐⭐ | ⭐⭐⭐ |
| OpenCV | ⭐⭐⭐ | ⭐⭐⭐⭐ | ⭐⭐⭐ | ⭐⭐⭐⭐ | ⭐⭐⭐⭐ |
Building Your First Face Recognition System: A Complete Example
Let's build a simple but functional face recognition system that can identify your friends.
Step 1: Install Dependencies
pip install face_recognition opencv-python numpy
Step 2: Prepare Your Database
Create a folder called known_faces/ with subfolders for each person:
known_faces/
├── john/
│   ├── john1.jpg
│   ├── john2.jpg
│   └── john3.jpg
├── sarah/
│   ├── sarah1.jpg
│   └── sarah2.jpg
└── mike/
    └── mike1.jpg
Step 3: The Code
import face_recognition
import os
import cv2
import numpy as np
from pathlib import Path

class FaceRecognitionSystem:
    def __init__(self, known_faces_dir):
        self.known_encodings = []
        self.known_names = []
        self.load_known_faces(known_faces_dir)

    def load_known_faces(self, directory):
        """Load all faces from the known_faces directory"""
        print("Loading known faces...")

        for person_dir in Path(directory).iterdir():
            if person_dir.is_dir():
                person_name = person_dir.name

                for image_path in person_dir.glob("*.jpg"):
                    image = face_recognition.load_image_file(str(image_path))
                    encodings = face_recognition.face_encodings(image)

                    if encodings:
                        self.known_encodings.append(encodings[0])
                        self.known_names.append(person_name)
                        print(f"  ✓ Loaded {person_name} from {image_path.name}")

        print(f"Loaded {len(self.known_encodings)} face(s) from {len(set(self.known_names))} person(s)")

    def recognize_faces_in_image(self, image_path):
        """Recognize all faces in an image"""
        image = face_recognition.load_image_file(image_path)
        face_locations = face_recognition.face_locations(image)
        face_encodings = face_recognition.face_encodings(image, face_locations)

        # Convert to OpenCV format for drawing
        image_cv = cv2.cvtColor(image, cv2.COLOR_RGB2BGR)

        for (top, right, bottom, left), face_encoding in zip(face_locations, face_encodings):
            # Compare with known faces
            matches = face_recognition.compare_faces(self.known_encodings, face_encoding, tolerance=0.6)
            name = "Unknown"

            # Calculate distances and find the best match
            face_distances = face_recognition.face_distance(self.known_encodings, face_encoding)

            if len(face_distances) > 0:
                best_match_index = np.argmin(face_distances)
                if matches[best_match_index]:
                    name = self.known_names[best_match_index]
                    confidence = (1 - face_distances[best_match_index]) * 100
                    label = f"{name} ({confidence:.1f}%)"
                else:
                    label = "Unknown"

            # Draw rectangle and label
            cv2.rectangle(image_cv, (left, top), (right, bottom), (0, 255, 0), 2)
            cv2.rectangle(image_cv, (left, bottom - 35), (right, bottom), (0, 255, 0), cv2.FILLED)
            cv2.putText(image_cv, label, (left + 6, bottom - 6), cv2.FONT_HERSHEY_DUPLEX, 0.6, (255, 255, 255), 1)

        return image_cv

# Usage
system = FaceRecognitionSystem("known_faces/")
result_image = system.recognize_faces_in_image("group_photo.jpg")

cv2.imshow("Face Recognition", result_image)
cv2.imwrite("result.jpg", result_image)
cv2.waitKey(0)
cv2.destroyAllWindows()
What This Does
- Loads all known faces from your directory structure
- Generates embeddings for each face (the 128-number vectors)
- Processes a new image, detecting all faces
- Compares each detected face against your database
- Draws boxes and labels with names and confidence scores
Output: An image with green boxes around faces, labeled with names like "John (94.3%)" or "Unknown"
The Dark Side: Privacy, Ethics, and Regulation
Face recognition isn't just a cool technology—it's a powerful tool that raises serious questions.
The Concerns
1. Surveillance & Civil Liberties
- Governments tracking citizens without consent
- Police using facial recognition at protests
- The "chilling effect" on free assembly and speech
2. Bias & Discrimination
- Early systems had significantly higher error rates for people of color
- Gender bias in verification systems
- Age bias (children and elderly are harder to recognize)
3. Data Security
- Biometric data breaches are permanent (you can't change your face like a password)
- Deepfakes and face-swapping pose identity theft risks
4. Consent & Ownership
- Who owns your face data?
- Can companies use your photos without permission?
- Should you be notified when you're being scanned?
The Current Regulatory Landscape (2024-2025)
European Union (GDPR & AI Act)
- Biometric data classified as "sensitive"
- Requires explicit consent for processing
- AI Act includes strict rules on "high-risk" AI systems
- Public facial recognition largely banned except for specific law enforcement cases
United States (Fragmented)
- Illinois BIPA: Requires written consent for biometric data collection
- San Francisco, Boston: Banned government use of facial recognition
- Clearview AI lawsuits: Ongoing battles over scraping public photos
- Federal legislation pending but slow-moving
China
- Widespread deployment in public spaces
- Social credit systems incorporating facial recognition
- "Jaywalking shame" systems that display faces of offenders on public screens
Recommendations for Developers
- Privacy by design: Minimize data collection
- Transparency: Tell users when and how you're using face recognition
- Consent: Get explicit opt-in, not opt-out
- Data minimization: Don't store raw images if you only need embeddings
- Regular audits: Test your system for bias across demographics
- Security: Encrypt biometric data, use secure storage
The Future: Where Are We Heading?
1. 3D Face Recognition
Moving beyond 2D photos to true 3D depth sensing:
- iPhone FaceID: Uses infrared dot projector
- Windows Hello: Depth cameras on laptops
- Advantages: Can't be fooled by photos or videos
- Challenges: More expensive hardware
2. Mask-Robust Recognition
Post-COVID, systems have adapted:
- Focus on periocular region (eyes and surrounding area)
- Multi-modal fusion (face + voice + gait)
- Thermal imaging for fever detection combined with ID
3. On-Device Processing
Privacy-first approaches:
- Apple processes FaceID entirely on-device (never leaves the phone)
- Federated learning for model training
- Homomorphic encryption for cloud-based matching
4. Emotion & Micro-Expression Analysis
Going beyond identity:
- Detecting lies in interrogations (controversial)
- Customer sentiment analysis in retail
- Driver drowsiness detection
- Mental health monitoring
5. Cross-Age Face Recognition
The holy grail: Recognizing people across decades:
- Finding missing children years after they disappeared
- Matching childhood photos to adult faces
- Age-invariant embeddings
6. Synthetic Faces & Deepfakes
The arms race:
- GANs creating photorealistic fake faces
- Deepfake detection as a growing field
- "Liveness detection" to prove you're not a video playback
Summary Cheat Sheet
| Term | The Question | The Math | The Analogy | Output |
|---|---|---|---|---|
| Detection | "Is a face present?" | Object Detection (Bounding Box) | Counting heads on a bus | Coordinates (x, y, w, h) |
| Verification | "Is this you?" | 1:1 Comparison (Distance < Threshold) | Passport Control | True/False + Confidence |
| Recognition | "Who is this?" | 1:N Search (Find Nearest Neighbor) | Checking a Wanted Poster | Name + Confidence or "Unknown" |
Key Takeaways
- Detection comes first: You can't recognize what you can't find
- Verification is easier than recognition: Comparing 1:1 is less error-prone than searching millions
- Embeddings are the magic: Converting faces to numbers makes everything possible
- Choose your tools wisely:
- Beginners →
face_recognitionorDeepFace - Production →
InsightFacewith a vector database - Mobile/Web →
MediaPipe
- Beginners →
- Privacy matters: Always consider the ethical implications
- Bias is real: Test your systems across diverse demographics
- Stay updated: This field moves fast—models from 2 years ago are already outdated
Resources to Keep Learning
Academic Papers (The Classics)
- FaceNet (Google, 2015): The paper that popularized triplet loss
- ArcFace (InsightFace, 2019): Angular margin loss for face recognition
- RetinaFace (2019): Single-stage face detection
Datasets for Training/Testing
- LFW (Labeled Faces in the Wild): 13,000 faces, the benchmark dataset
- CelebA: 200,000 celebrity faces with attributes
- VGGFace2: 3.3 million images, 9,000 identities
- MS-Celeb-1M: 1 million celebrities (now controversial/removed due to privacy)
Tutorials & Courses
- PyImageSearch: Adrian Rosebrock's face recognition tutorials
- DeepLearning.AI: Andrew Ng's Convolutional Neural Networks course
- Fast.ai: Practical Deep Learning for Coders
Communities
- r/computervision on Reddit
- Papers With Code: Track state-of-the-art benchmarks
- GitHub: Search for "face-recognition" and sort by stars
Final Thoughts
Face recognition has gone from science fiction to everyday reality in just a decade. It unlocks our phones, tags our friends, and increasingly, watches our streets.
As developers, we have a responsibility to build these systems thoughtfully—balancing innovation with privacy, accuracy with fairness, and convenience with consent.
Whether you're building a fun app to recognize your pets or deploying a security system for a bank, remember: With great power comes great responsibility.

And also, maybe, a really cool demo that impresses your friends.
Now go forth and detect, verify, and recognize—but do it wisely.

COMMENTS (0)
Join the discussion on AI engineering and technical research.